


Streamlit is a free web publishing technology popular with data scientists who publish data analysis and visualization solutions as web apps accessible by others. Streamlit is popular for sharing prototypes and letting others experience first-hand the insights data scientists uncover during data exploration and model development.
What makes Streamlit unique is that it:
- Doesn't require web development knowledge to create great web data apps
- Can be easily added to Python data science code
- Supports the same data analysis and visualization objects Data Scientists use--such as Panda Dataframes
- Contains a rich set of data visualization and UI widgets, such as histograms, maps, text fields and sliders.
In this walk-through, we'll create a Streamlit app, test it locally, containerize it with Docker, and finally deploy it as a web site on Azure App Service using the Azure Container Registry.
Install Prerequisites
To complete this tutorial, you'll need to have Streamlit and Docker desktop installed. Docker is free for individuals or small organizations, but may require licensing for enterprise users.
I'll be using Windows 11 in this demo, so Anaconda is also required. Streamlit requires the use of Anaconda for environment configuration on Windows, but it's not a hard requirement for macOS and Linux if you have Python3 and pip installed in your environment already. Follow the Streamlit installation instructions for your client environment if you're not sure which Python environment approach to use.
To complete the Azure deployment steps, you'll also need to have the Azure CLI installed.
Create a Python Environment
With all prerequisites installed, we'll first create a new Python environment. Since I'm running on Windows and using Anaconda for this walk-through, I'll create a new environment called streamlit from Anaconda Navigator. macOS and Linux instructions are virtually identical (except on those platforms using Anaconda is optional).
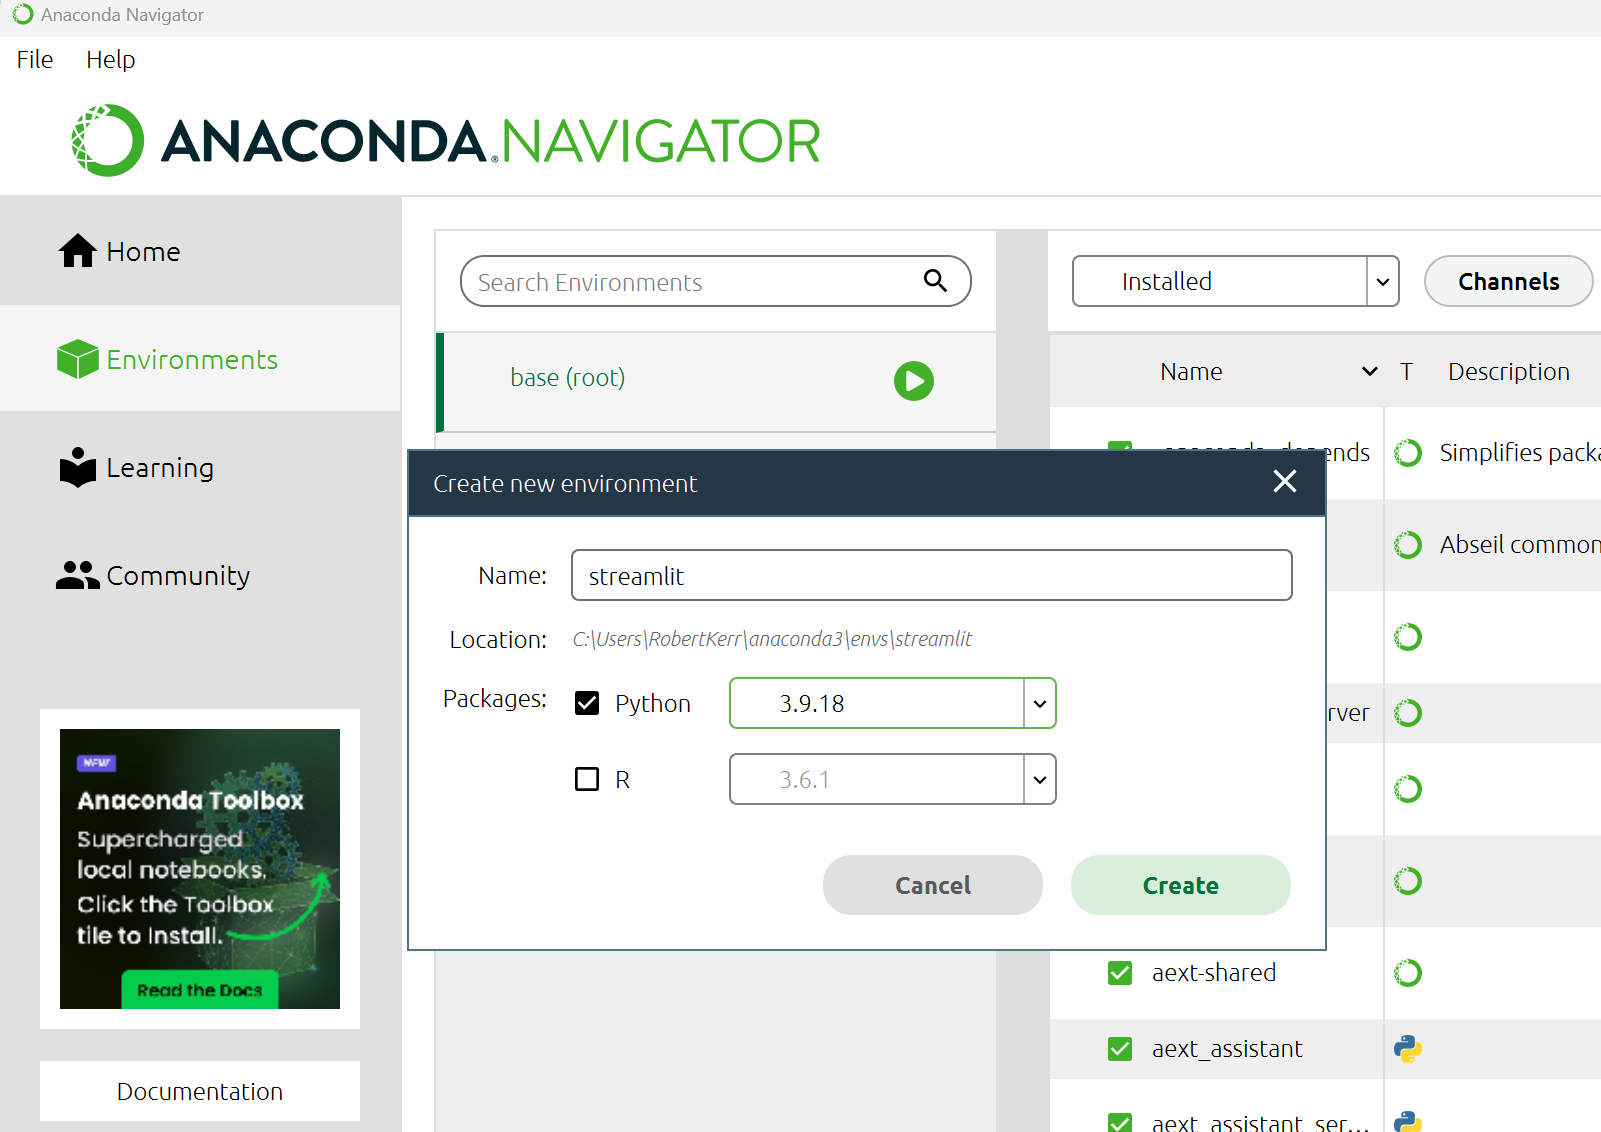
Once created, launch a new terminal session from within Anaconda for the streamlit environment.
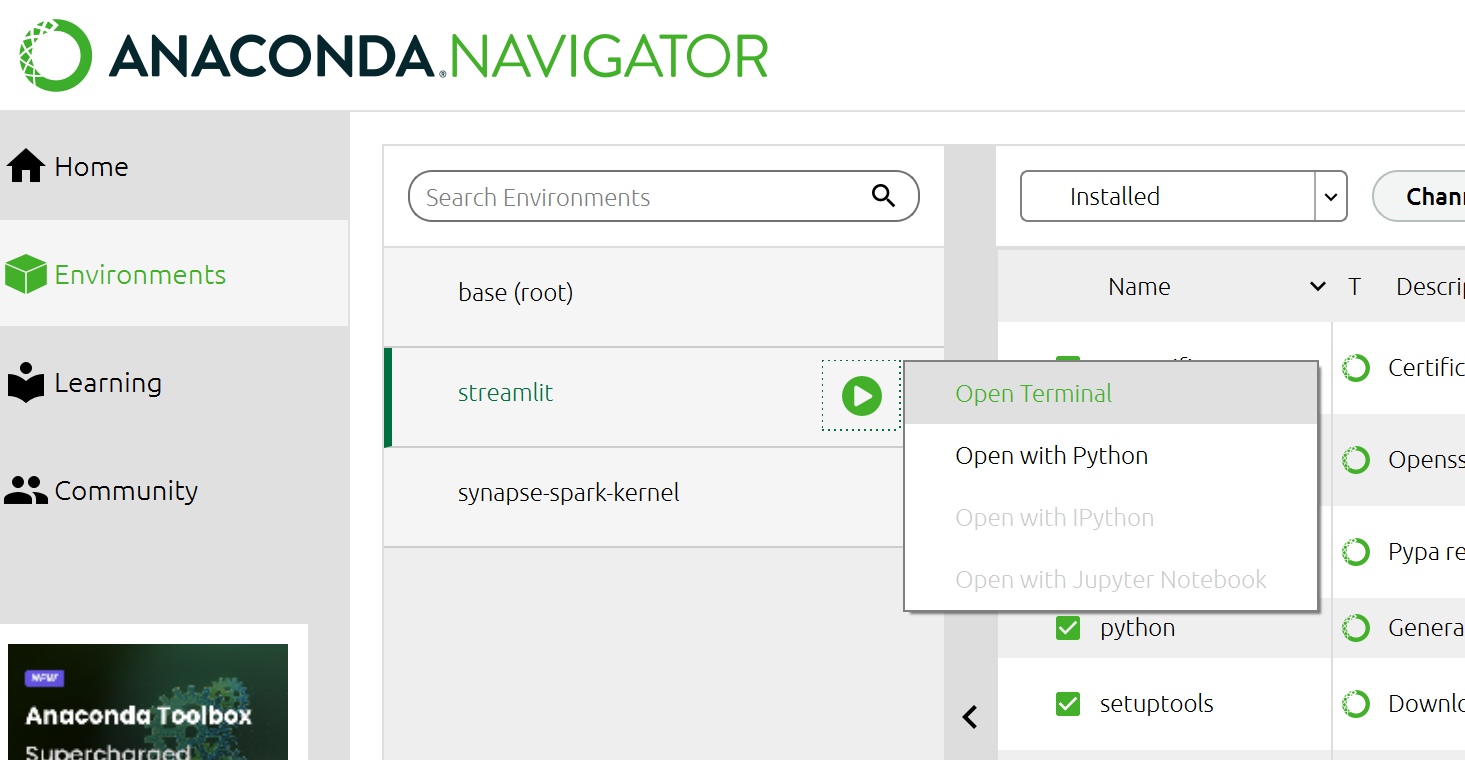
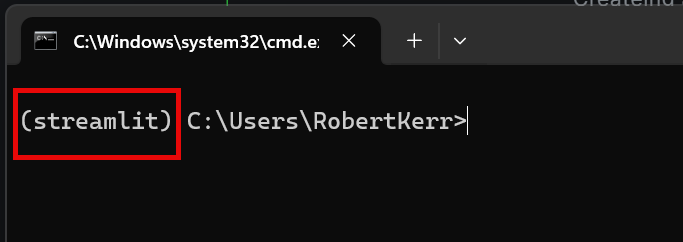
Verify the terminal window is running in the new environment by checking the tag before the "C:" prompt.
Install Streamlit into the Python Environment
Next install the Streamlit development tools in the terminal using pip:
pip install streamlitPip will download Streamlit and its dependencies, installing them into the current Python environment.
Collecting streamlit
  Using cached streamlit-1.28.2-py2.py3-none-any.whl.metadata (8.1 kB)
Collecting altair<6,>=4.0 (from streamlit)
  Using cached altair-5.1.2-py3-none-any.whl.metadata (8.6 kB)
Collecting blinker<2,>=1.0.0 (from streamlit)
  Using cached blinker-1.7.0-py3-none-any.whl.metadata (1.9 kB)
  .
  .
  .
Once successful, we're ready to move on to creating the app and testing it locally.
Create the Streamlit App
We'll create a basic Streamlit app, using one of the Streamlit "Getting Started" example applications. If you're interested in a line-by-line explanation of the Streamlit code, visit the above link. If not, you can copy/past the code from the code window below.
Create a subfolder for the app code and Dockerfile
When a Streamlit app is deployed to docker (the last step in this tutorial), it must be in a folder beneath the container root. So first create a folder called app which will become that sub-folder when the Docker container is built later on.
The file layout for the Streamlit app we're building will look like this when we're finished.
my-app   # This will become the root of the Docker container
|
 -- App  # any name is ok, but it must be called out in the Dockerfile
    --app.py
--DockerfileCreate a Streamlit app
Streamlit apps can be one or many pages. Each Python file in a Streamlit app generates a single page of the final web app. In this solution we'll create a simple, single-page app.
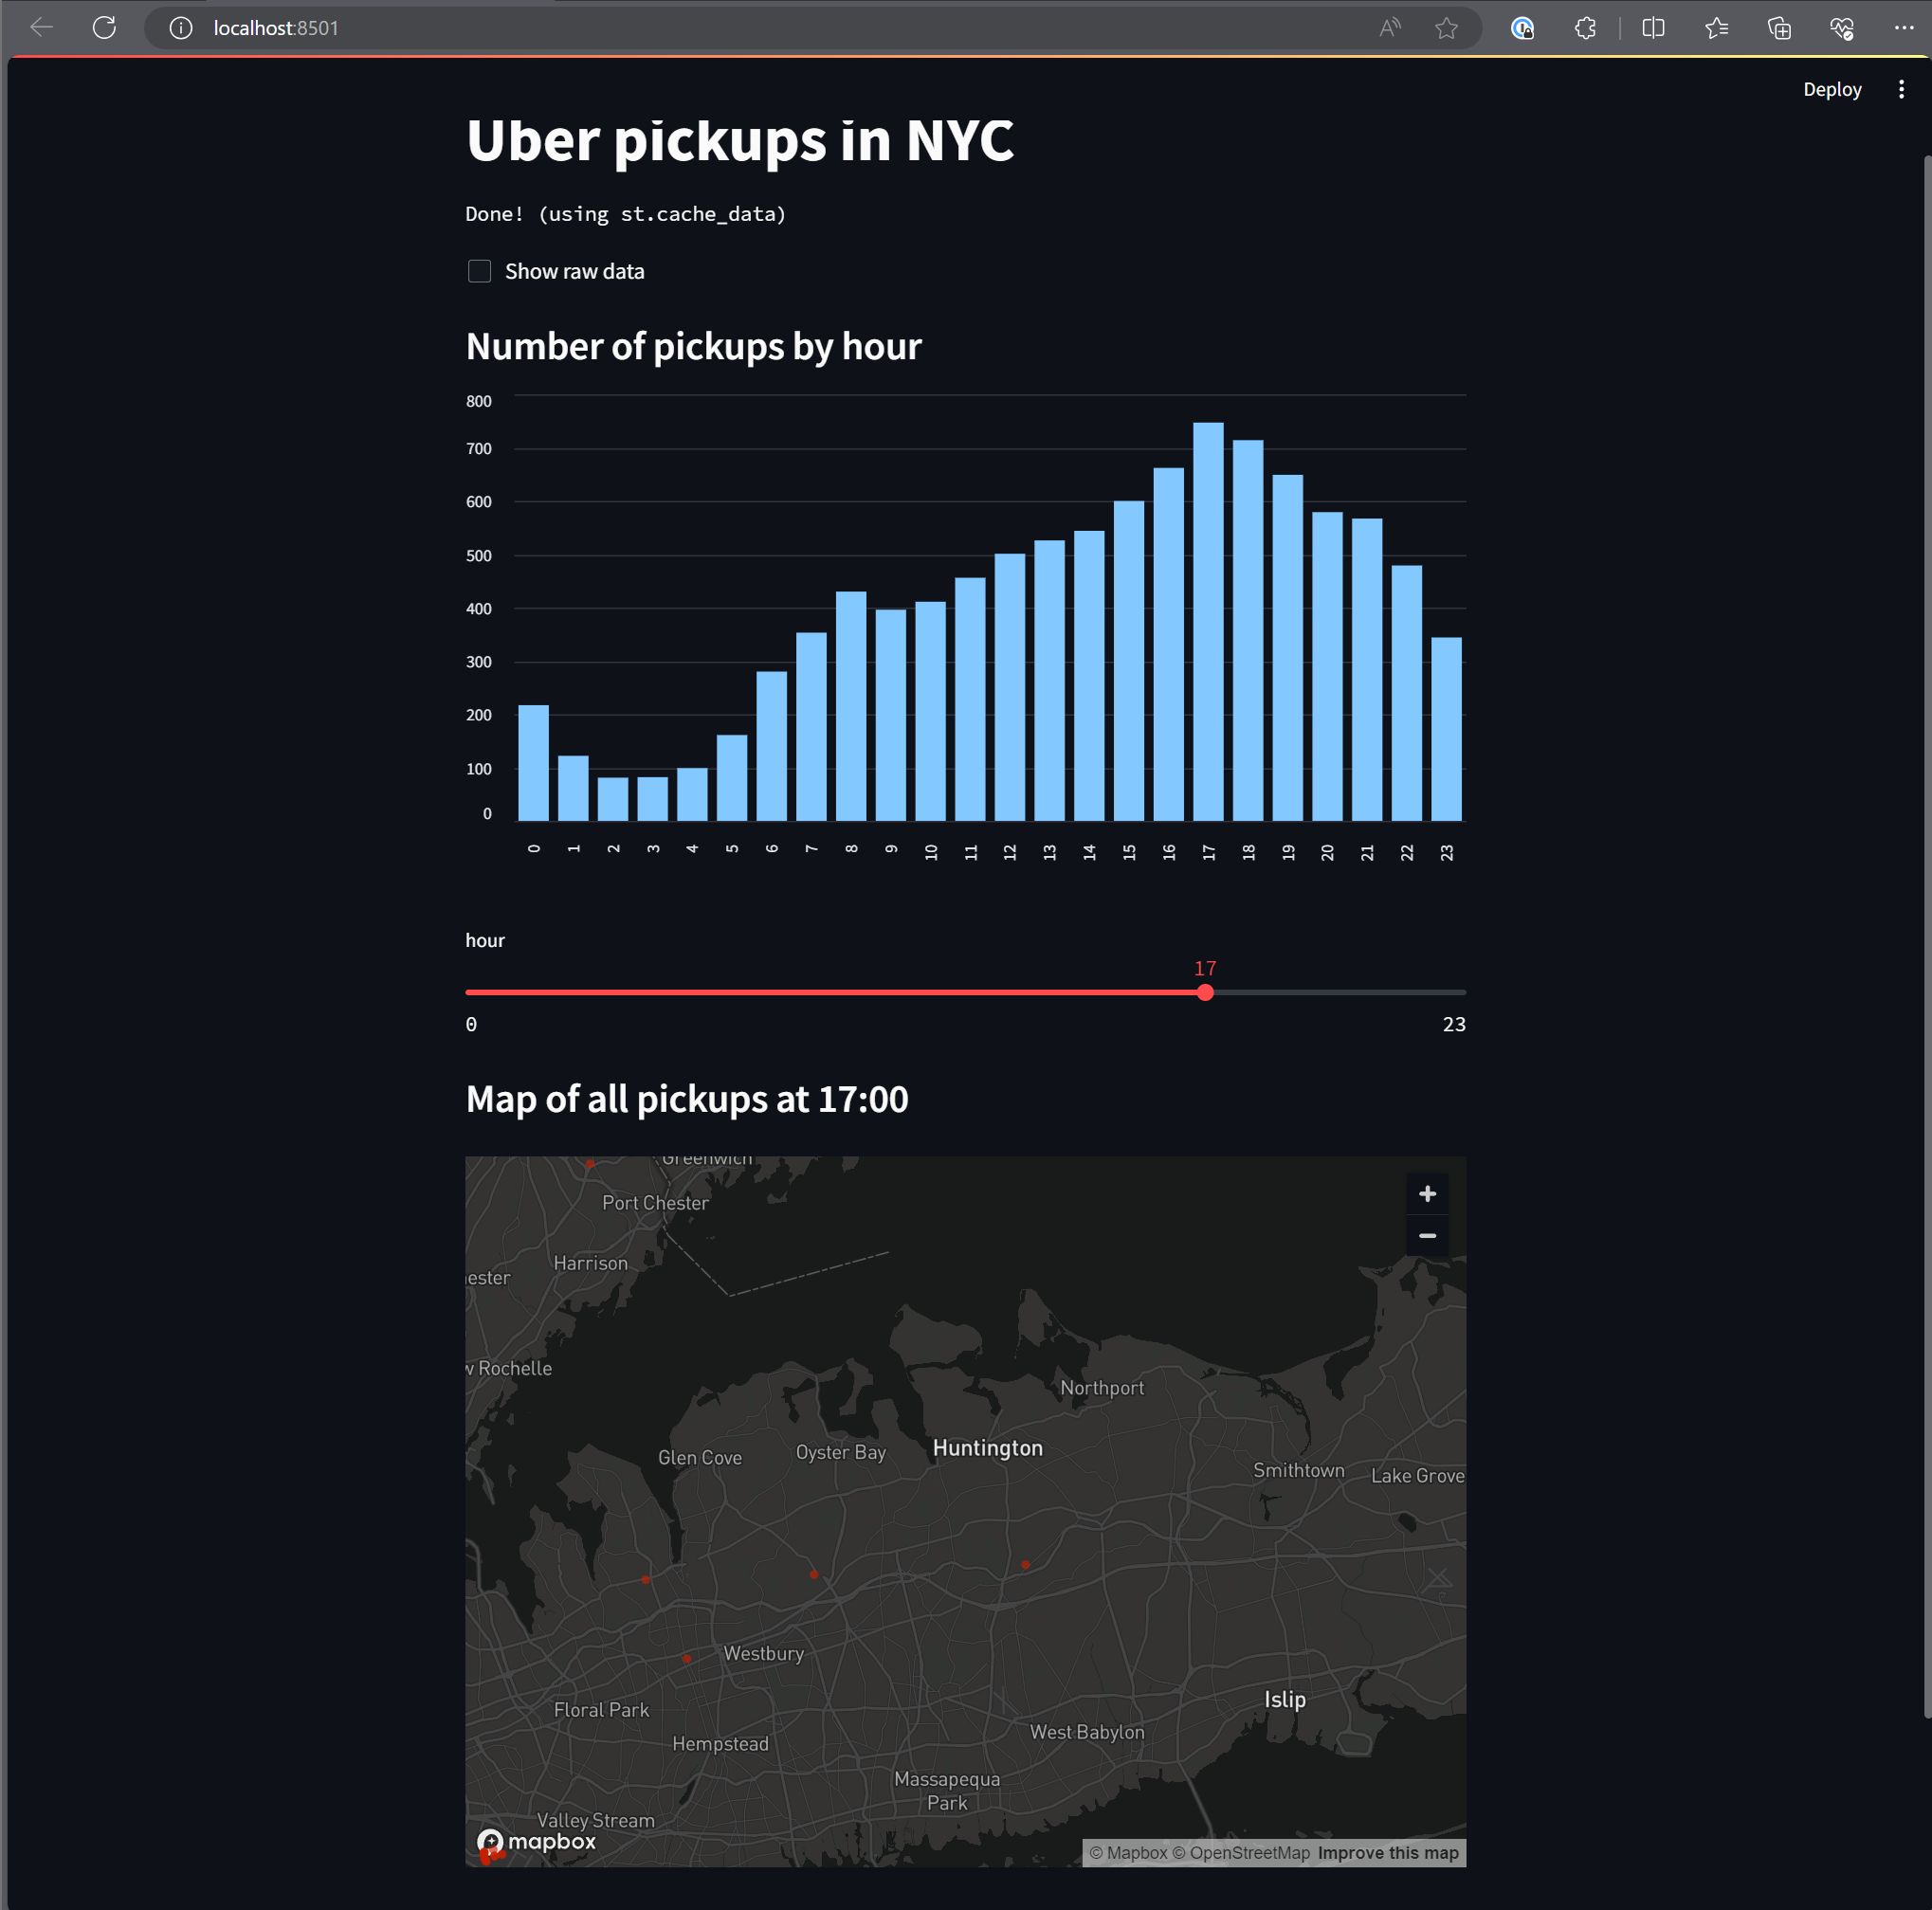
Within the app folder, create a single app.py source file, and add the following code.
import streamlit as st
import pandas as pd
import numpy as np
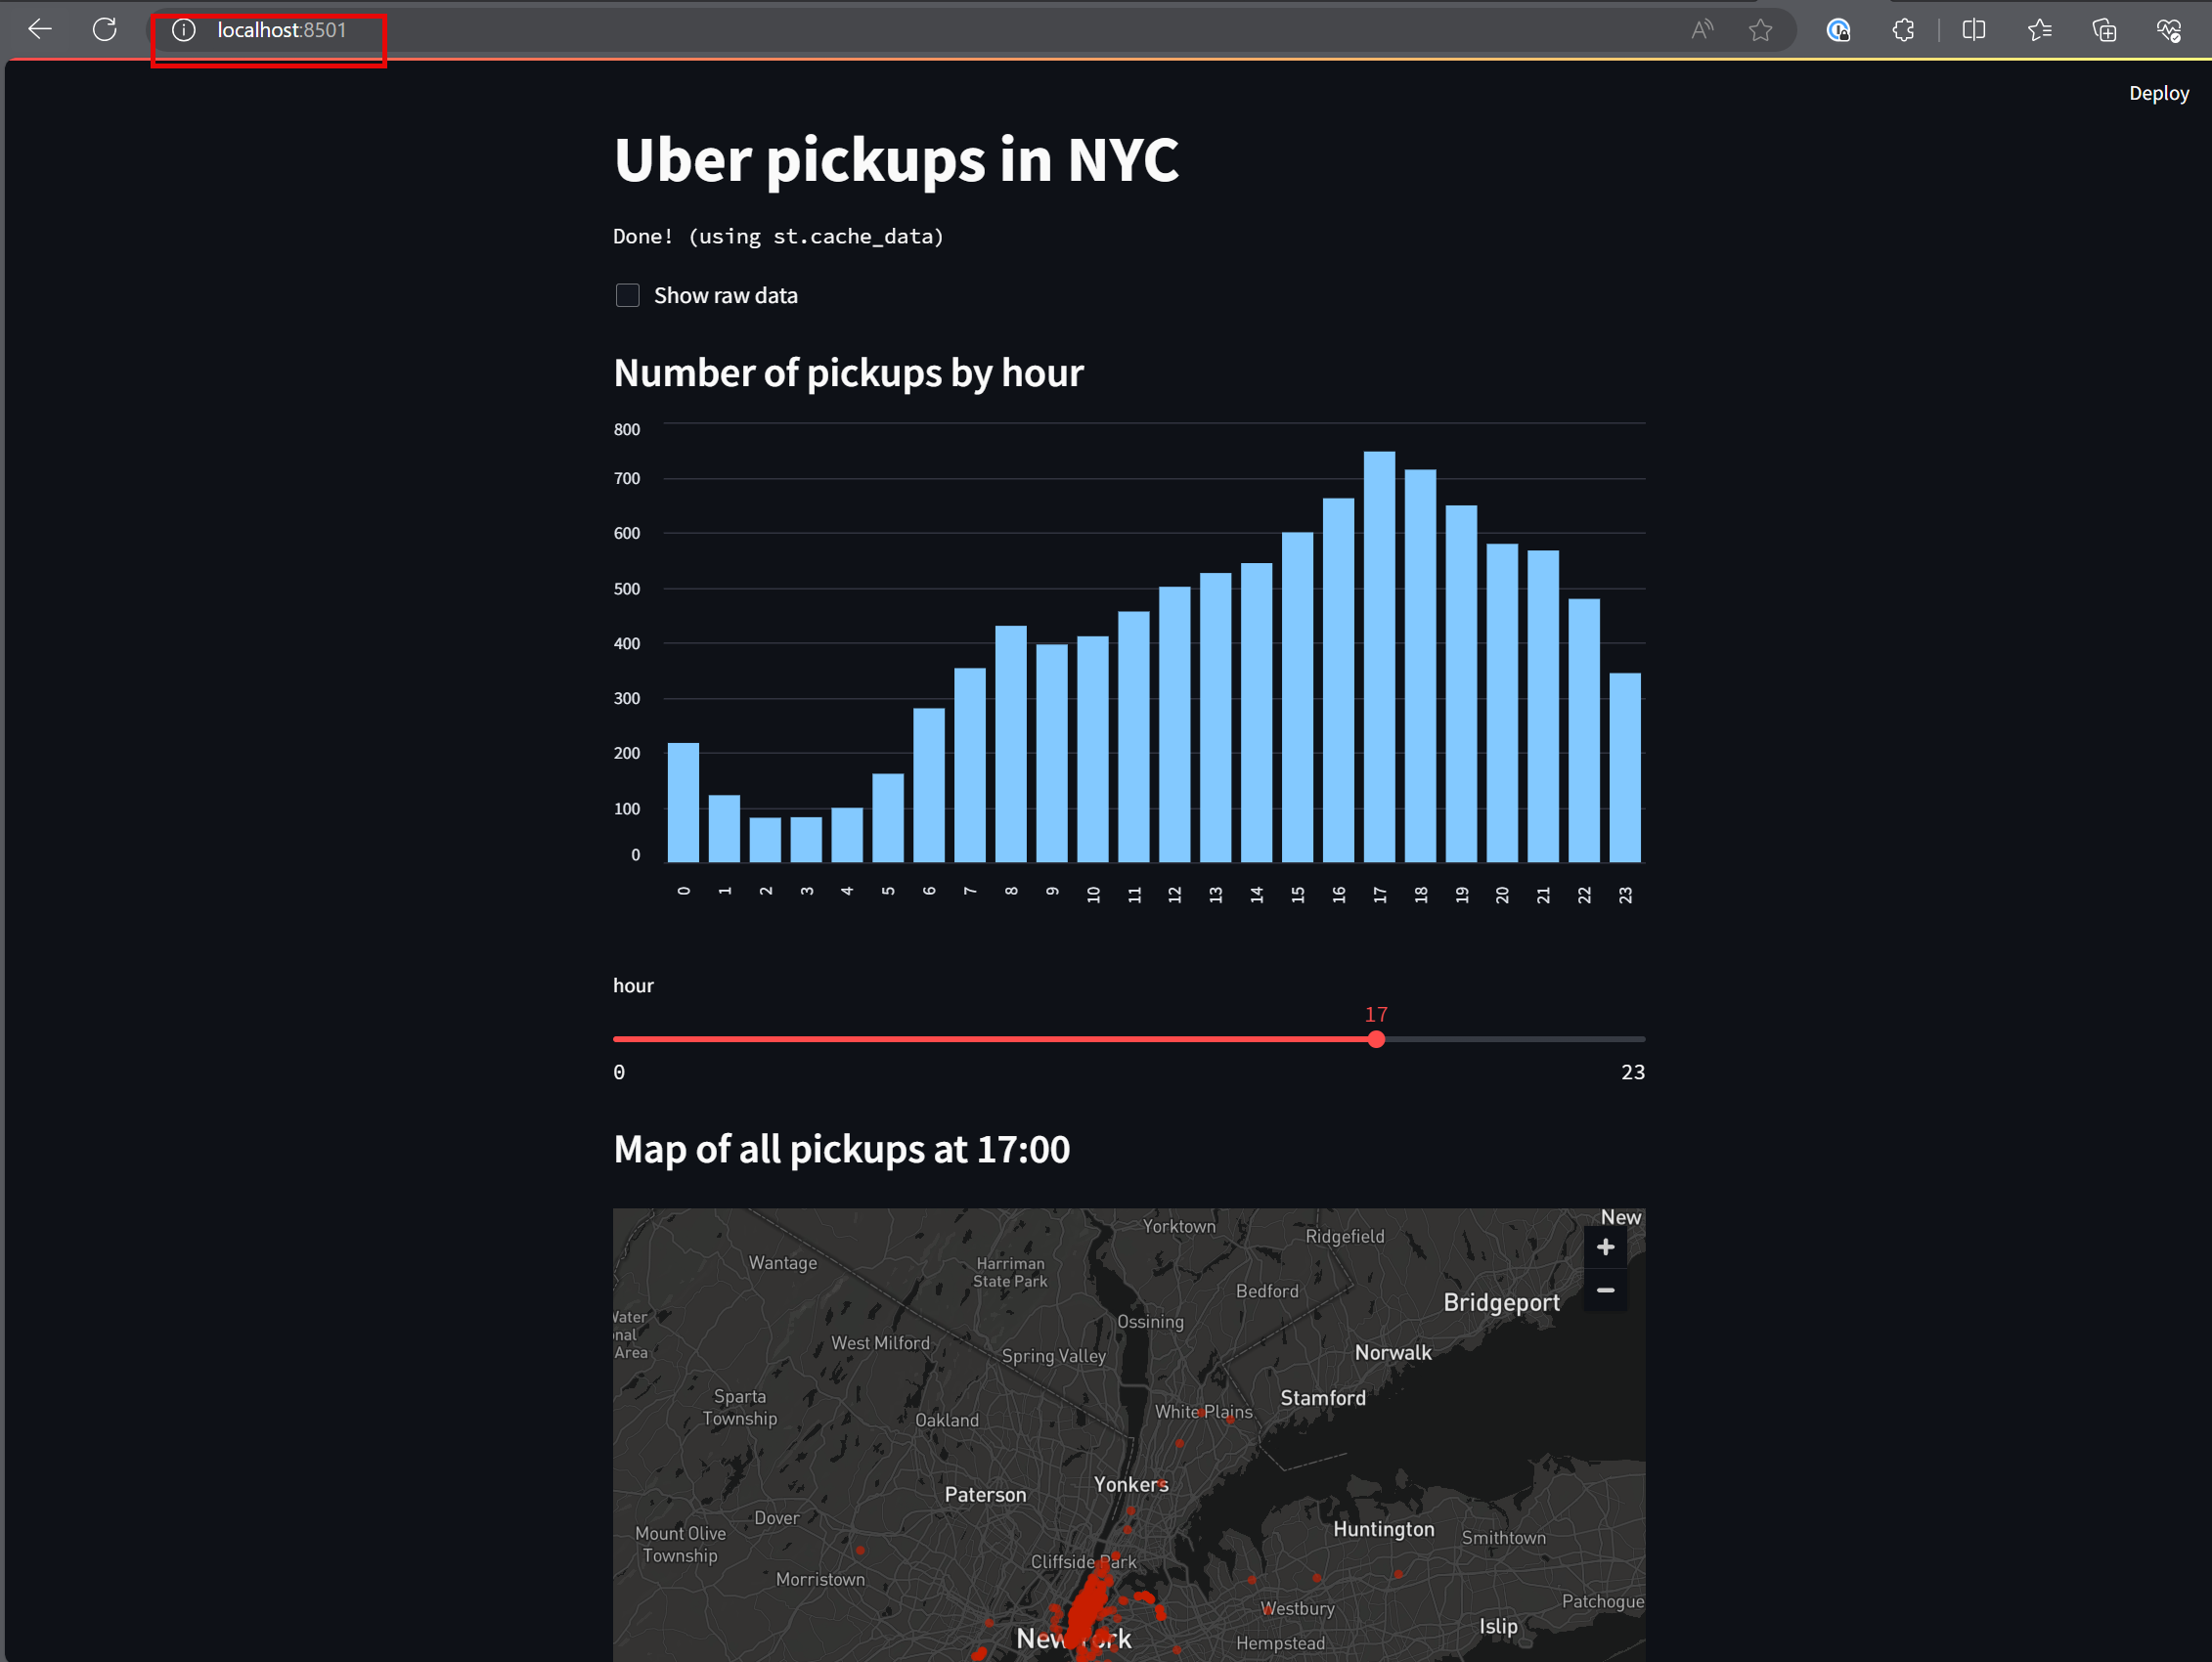
st.title('Uber pickups in NYC')
DATE_COLUMN = 'date/time'
DATA_URL = ('https://s3-us-west-2.amazonaws.com/'
'streamlit-demo-data/uber-raw-data-sep14.csv.gz')
@st.cache_data
def load_data(nrows):
data = pd.read_csv(DATA_URL, nrows=nrows)
lowercase = lambda x: str(x).lower()
data.rename(lowercase, axis='columns', inplace=True)
data[DATE_COLUMN] = pd.to_datetime(data[DATE_COLUMN])
return data
data_load_state = st.text('Loading data...')
data = load_data(10000)
data_load_state.text("Done! (using st.cache_data)")
if st.checkbox('Show raw data'):
st.subheader('Raw data')
st.write(data)
st.subheader('Number of pickups by hour')
hist_values = np.histogram(data[DATE_COLUMN].dt.hour, bins=24, range=(0,24))[0]
st.bar_chart(hist_values)
# Some number in the range 0-23
hour_to_filter = st.slider('hour', 0, 23, 17)
filtered_data = data[data[DATE_COLUMN].dt.hour == hour_to_filter]
st.subheader('Map of all pickups at %s:00' % hour_to_filter)
st.map(filtered_data)Test the App Locally
To test the Streamlit app locally, simply type the following command in the folder where the app.py file was created:
streamlit run app.pyStreamlit will launch the app in your default web browser and connect to the Streamlit local web server serving content on port 8501.
At this point the web page is being served by Streamlit's own internal web server. At the end of this tutorial, the same Streamlit app will be running on Azure's web services.
If the app is working locally, we can move on to containerizing it in Docker, and ensuring the Docker version works.
Create a Docker Container for the Streamlit App
Now that the app works, let's create a Docker container and install the app into it.
Create the Dockerfile
Docker containers are built by creating a special file called Dockerfile that lists the commands needed to organize our files within a Linux image, and download dependencies our code needs into the image.
In the same folder as app.py (in my example the folder is app), create a text file called Dockerfile and add the following contents to it.
FROM python:3.9-slim

WORKDIR /app

RUN apt-get update && apt-get install -y \
    build-essential \
    curl \
    software-properties-common \
    git \
    && rm -rf /var/lib/apt/lists/*

COPY  . .

RUN pip3 install -r requirements.txt

EXPOSE 8501

HEALTHCHECK CMD curl --fail http://localhost:8501/_stcore/health

ENTRYPOINT ["streamlit", "run", "test1.py", "--server.port=8501", "--server.address=0.0.0.0"]
While this post isn't a full tutorial on docker, this file provides the following blueprint for Docker to use when building the Docker image:
- The first
RUNcommand installs Linux dependencies and executes any OS-level configurations. - The
COPYcommand copies the python file(s) from our file system into the container's file system. pipis run to download all of the Python dependencies listed in therequirements.txtfile (covered next) and package them inside the container.- The web app will listen on port 8501.
- The
ENTRYPOINTdefines the command that should be run to start the web server when the container is started.
Listing Python Requirements
In the Dockerfile we specified that the file requirements.txt will list Python dependencies the Streamlit application needs to run. To satisfy the requirements of this simple app, create a new file requirements.txt in the app sub-folder.
altair
pandas
streamlit
Create and register the local Docker image
Now, from the app folder, run the following Docker command to create the image. This is equivalent to preparing a virtual machine disk image, which will be used to spin up a local VM.
docker build -t streamlit .The parameter streamlit in the above command is the "tag" applied to the image. This tag is the image name that we'll use when running or deploying the image later.
Once the image finishes building, check that it was registered in your local Docker image repository.
docker imagesThe images command should return a list of images. If this is the first image you've created, only the streamlit image will be present.
(streamlit) C:\...\app>docker images
REPOSITORY         TAG       IMAGE ID       CREATED       SIZE
streamlit          latest    a2ee4984fadb   1 minute ago  1.09GB
Finally, run the docker image locally using the docker run command.
(streamlit) C:\...\app>docker run -p 8501:8501 streamlit
Collecting usage statistics. To deactivate, set browser.gatherUsageStats to False.
  You can now view your Streamlit app in your browser.
  URL: http://0.0.0.0:8501
The app will be running on http://localhost:8501. Browse to this URL and verify the app is running. While the hostname (localhost) and port (8501) are the same as before, this time the web app is being served by Docker VM using the Linux image we just created.
This image can be run by any web server that can host a Docker container. Azure App Service is one such web server, and we'll configure Azure next.
Deploy the Docker Container to Azure Container Registry
Now that the app is finished and is packaged into a Docker container, we can publish the container in an Azure Container Registry.
Most of the following Azure configuration can be done either using the Azure web-based portal, or via the Azure command line interface (CLI). In this post I'll use the CLI.
Create a Resource Group
To keep all resources together (and to make it easier to delete the entire solution later), create a new Azure resource group (-n) in the Azure region (-l) that's closest to you.
az group create -n <group name> -l <region>Create a Container Registry
A container registry is a location where we store the Docker container. The Azure App Service will fetch the Docker image from the registry whenever the app is started.
The registry name must be globally unique among all Azure users.
az acr create -n <registry name> -g <group name> -l <region> --sku BasicWith this command a new registry is created within the resource group created in the first step, with an Azure Basic pricing SKU, and having the name specified by the -n parameter (which must be unique).
Fetch Azure Container Registry Credentials
To publish containers to the ACR, our docker instance needs to authenticate with Azure using an ACR username and password. This can be obtained using the CLI.
# Enable admin rights for this Azure CLI session
az acr update -n <registery name> --admin-enabled true

# show the username/password used to publish containers
az acr credential show --name <registry name>.azurecr.io
The output from the credential show command will be the username and two passwords to use when authenticating to the ACR to publish containers.
USERNAME          PASSWORD  PASSWORD2
---------------   --------  ---------
<registry name>   ********  *********
Push the Docker image to the Container Registry
Now push the local Docker image to the registry. To login, you'll be prompted for the username/password displayed in the previous step.
The next commands have several parameters:
- registry name - the name used to create the registry
- local tag - the tag assigned to the Docker image above (I used 'streamlit')
- remote tag - assign a tag to use as the name of the image in the Azure container registry
- v1 - a version of the image, e.g. "v1", "v2", etc. If you update the container later, use the same remote tag and a new version label.
# Authenticate to the container registry
docker login <registry name>.azurecr.io

# Tag the image for deployment. :v1 is the image version
docker tag <local tag> <registry name>.azurecr.io/<remote tag>:v1

# Deploy the image
docker push <registry name>.azurecr.io/<remote tag>:v1
Create an Azure App Service to launch the app on the Internet
The final step in the app publishing process is to create an Azure App Service, and publish the container to the web.
Create an App Service
Create an app service plan (if you don't already have one). The app plan name is a name you assign to refer to the plan from later CLI commands.
az appservice plan create -g <group name> -l <region> -n <web app plan name> --is-linux --sku B1Create a Web Site
Note that I'm passing in the username/password of the container registry. If these fields aren't passed in via the CLI, Azure will attempt to use your authenticated session (which, if you're still in the same terminal session should work).
web app name is a name you assign to refer to the web app (and is what the Azure portal will display in its list of web apps in your subscription).
Azure will use these credentials to fetch the Docker from the Container Registry when deploying the web app.
The following command is split to multiple lines for readability.
az webapp create -n <web app name> -p <web app plan name> \
-g <group name> \
-i <registry name>.azurecr.io/<remote tag>:v1 \
-s <registry username> \
-w <registry password>
After the web site is created, Azure will launch the site. It may take several minutes for the site to become online and active. Have patience.
Test the final app
The URL will be .azurewebsites.net prefixed by the web app name provided in the previous command.
Browsing to the public web URL, we can see the Streamlit app running on the Internet-facing web app.
az webapp browse -n <web app name> -g <resource group>