

In this post, we'll implement all of the above components and have a fully functional turn-based chatbot using Google Gemini-Pro as the backend AI model in 20 lines of python code!
This chatbot will be simple by design, so it's easy to understand, but lays down the foundation for more sophisticated and even more useful solutions.
A walk-through of this app build is available on YouTube! The remainder of the written walk through starts after the embedded video.
Chatbot Architecture
For this chatbot, we'll only need two software components: Streamlit and Google Gemini-Pro.
- Streamlit is a framework for building data science applications, and provides pre-built components to support conversational UI which lends itself well to this proof-of-concept app.
- Gemini Pro is the version of Google Gemini in preview (at the time of this writing), and will process user prompts, and provide chat responses.
Streamlit (UI)
This chatbot is built with Streamlit, a Python-based, open-source app framework for Machine Learning and Data Science apps. Streamlit excels at quickly building applications that leverage AI/ML APIs and SDKs, such as chatbots and data visualization tools.
We'll use Streamlit to provide the UI to capture input and display output, and to control application session flow.
Google Gemini-Pro (LLM)
For the AI model to formulate responses, we'll use Gemini-Pro. It's well suited to understand freeform text input and formulate text responses, and it's trained on a vast corpus of public domain knowledge.
Chat History (Context)
Usually, we would use custom data structures (or a middleware like LangChain) to maintain chat history for session context--to allow users to ask follow-up questions, for example. In this case, Google provides a chat history manager that we can leverage within Streamlit, so we'll use it in this example chatbot!
Let's Build!
The four steps to build the chatbot are:
- Get a Gemini key from Google using your GCP account.
- Initialize a new Streamlit app.
- Create an object in the Streamlit app to store chat context history.
- Create the app's UI.
Get a Gemini Key from Google Cloud
Gemini is a billable service, so if you don't have a Google Cloud account with a payment method applied, you'll probably need one.
Follow along Google's Python QuickStart for Gemini, which explains how to create a project and get a Gemini API key. I'd also suggest following the first Jupytr Notebook walk-through in the QuickStart article to make sure your key works before building the Streamlit app and you have a general idea of what responses to expect to your test prompts.
Initialize New Streamlit App
If you're new to Streamlit, follow along their tutorial on installation and creating a basic app shell.
Install Dependencies
We'll be importing several dependencies that probably aren't included in the Python environment we created above, so use pip to install them from the command line.
pip install -q -U streamlit
ip install -q -U google-generativeai
# install any other dependencies needed
Import Dependencies
This app requires imports for Streamlit, Google Generative AI, and a few utilities to convert responses into Markdown format:
import os
import textwrap
from IPython.display import display
from IPython.display import Markdown
import streamlit as st
import google.generativeai as genai
Launch Your IDE
I use Visual Studio Code to develop Streamlit apps, so with the environment configured, time to launch VS Code:
code .Initialize the Gemini-Pro LLM Service Object
I stored my Gemini API key in the OS environment, so in the Gemini initialization I grab the key from the environment using os.getenv, and then create a new model reference object using that key:
# Initialize Gemini-Pro
genai.configure(api_key=os.getenv("GOOGLE_GEMINI_KEY"))
model = genai.GenerativeModel('gemini-pro')
Create a Chat History (Context) Object
Google provides a built-in chat history object that provides excellent out-of-the-box functionality:
- It maintains chat history state, indexed by user and assistant. Typically we would need to do this ourselves (e.g. an array of chat turns stored in a session state object). Nice to see this included as an SDK feature!
- When submitting the next user response (e.g. a follow-up question), the Gemini SDK automatically sends chat history back to Gemini with each new prompt, allowing the LLM to use this history object to automatically provide context.
Here's the code to create the Chat History object and store it in the Streamlit session state:
# Add a Gemini Chat history object to Streamlit session state
if "chat" not in st.session_state:
    st.session_state.chat = model.start_chat(history = [])
Prompt the User for Their Next Turn
Streamlit has a built-in syntax construct to prompt users for input and assign input to an output variable in one line of code:
if prompt := st.chat_input("What can I do for you?"):This line of code creates a text input box, displays the text "What can I do for you?" within the text field until the user starts typing, and after the user completes the text entry stores the input text in the variable prompt.
Send the User's Entry to Gemini & Display the Response
Using the Gemini SDK chat history object, the new text--along with the stored chat history for context--is sent to the cloud-base Gemini LLM, and we wait for the response in the same line of code:
# Send user entry to Gemini and read the response
response = st.session_state.chat.send_message(prompt)
When response is returned, we use this code to display the most recent response from Gemini:
# Display last LLM response, first converting it to Markdown format
response_markdown = to_markdown(response.text).data
with st.chat_message("assistant"):
	st.markdown(response_markdown)
Display Running History of the Chat
The last piece of the UI is to display the history of the chat session for the user. This is done by iterating over the Chat History object maintained by the Gemini SDK:
# Display chat messages from history above current input box
for message in st.session_state.chat.history:
    with st.chat_message(role_to_streamlit(message.role)):
        st.markdown(to_markdown(message.parts[0].text).data)
And that's it! We have a chatbot. Let's see how it works.
Running the Chatbot
Running the chatbot from the terminal:
# I named my Streamlit program main.py
streamlit run main.py
User Experience
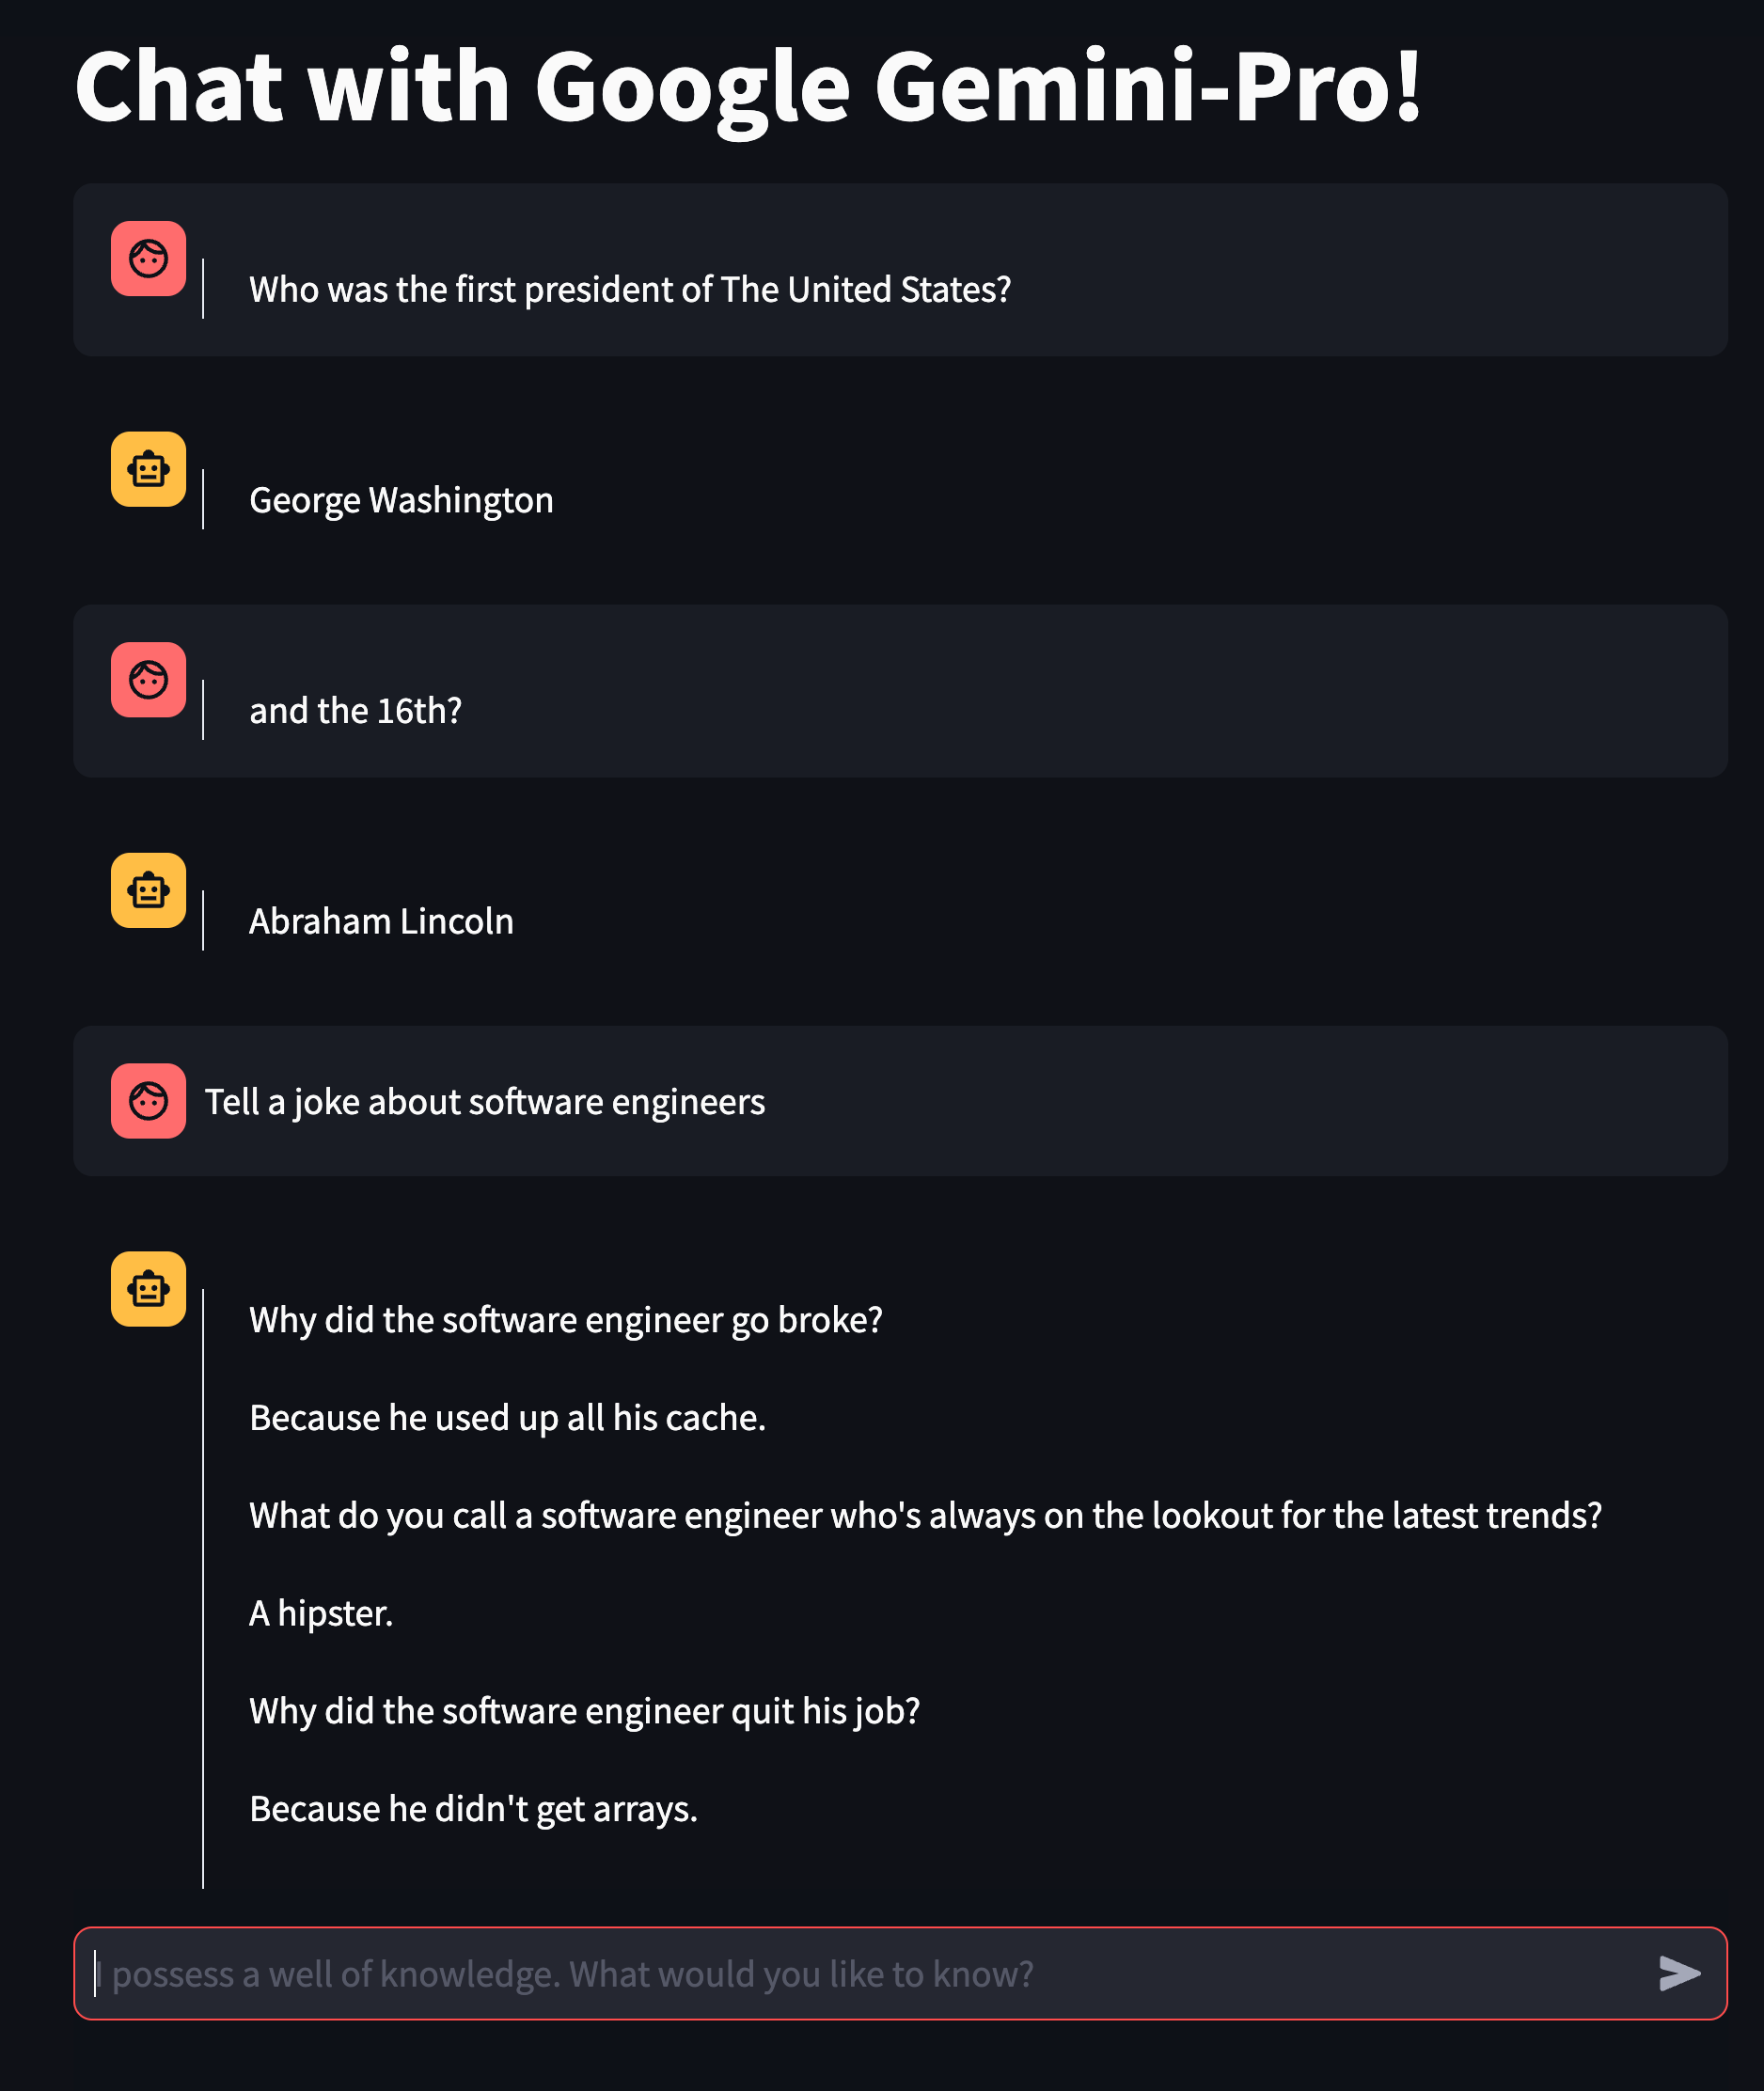
Once the Streamlit app launches, we can start chatting with Gemini-Pro! Note that I was able to ask follow-up questions, such as "and the 16th?" without reminding Gemini the last question was about US presidents. Because the Gemini SDK maintained chat history and submitted it to Gemini, Gemini understood that I meant "and the 16th president?".