


Azure AI Document Intelligence (formerly called Form Recognizer) is a service that reads documents and forms uses machine learning to analyze documents stored in various formats, such as JPEG and PDF– and extracts structured data from the content.
Often, we will use one of the provided high-level language SDKs (C#, Java, Python, or JavaScript) to access these back-end services. However, it is also possible to call the services directly via the underlying REST API.
This post provides an end-to-end tutorial how to use the REST API, including what I think can be the most confusing/complex part of the process – encoding submitted documents and embedding them with in JSON payloads.
Video Tutorial Available
The balance of this tutorial-orientated post is available in video format on YouTube using the following embedded video. The rest of the text walk-through continues after the embedded video.
Source Document
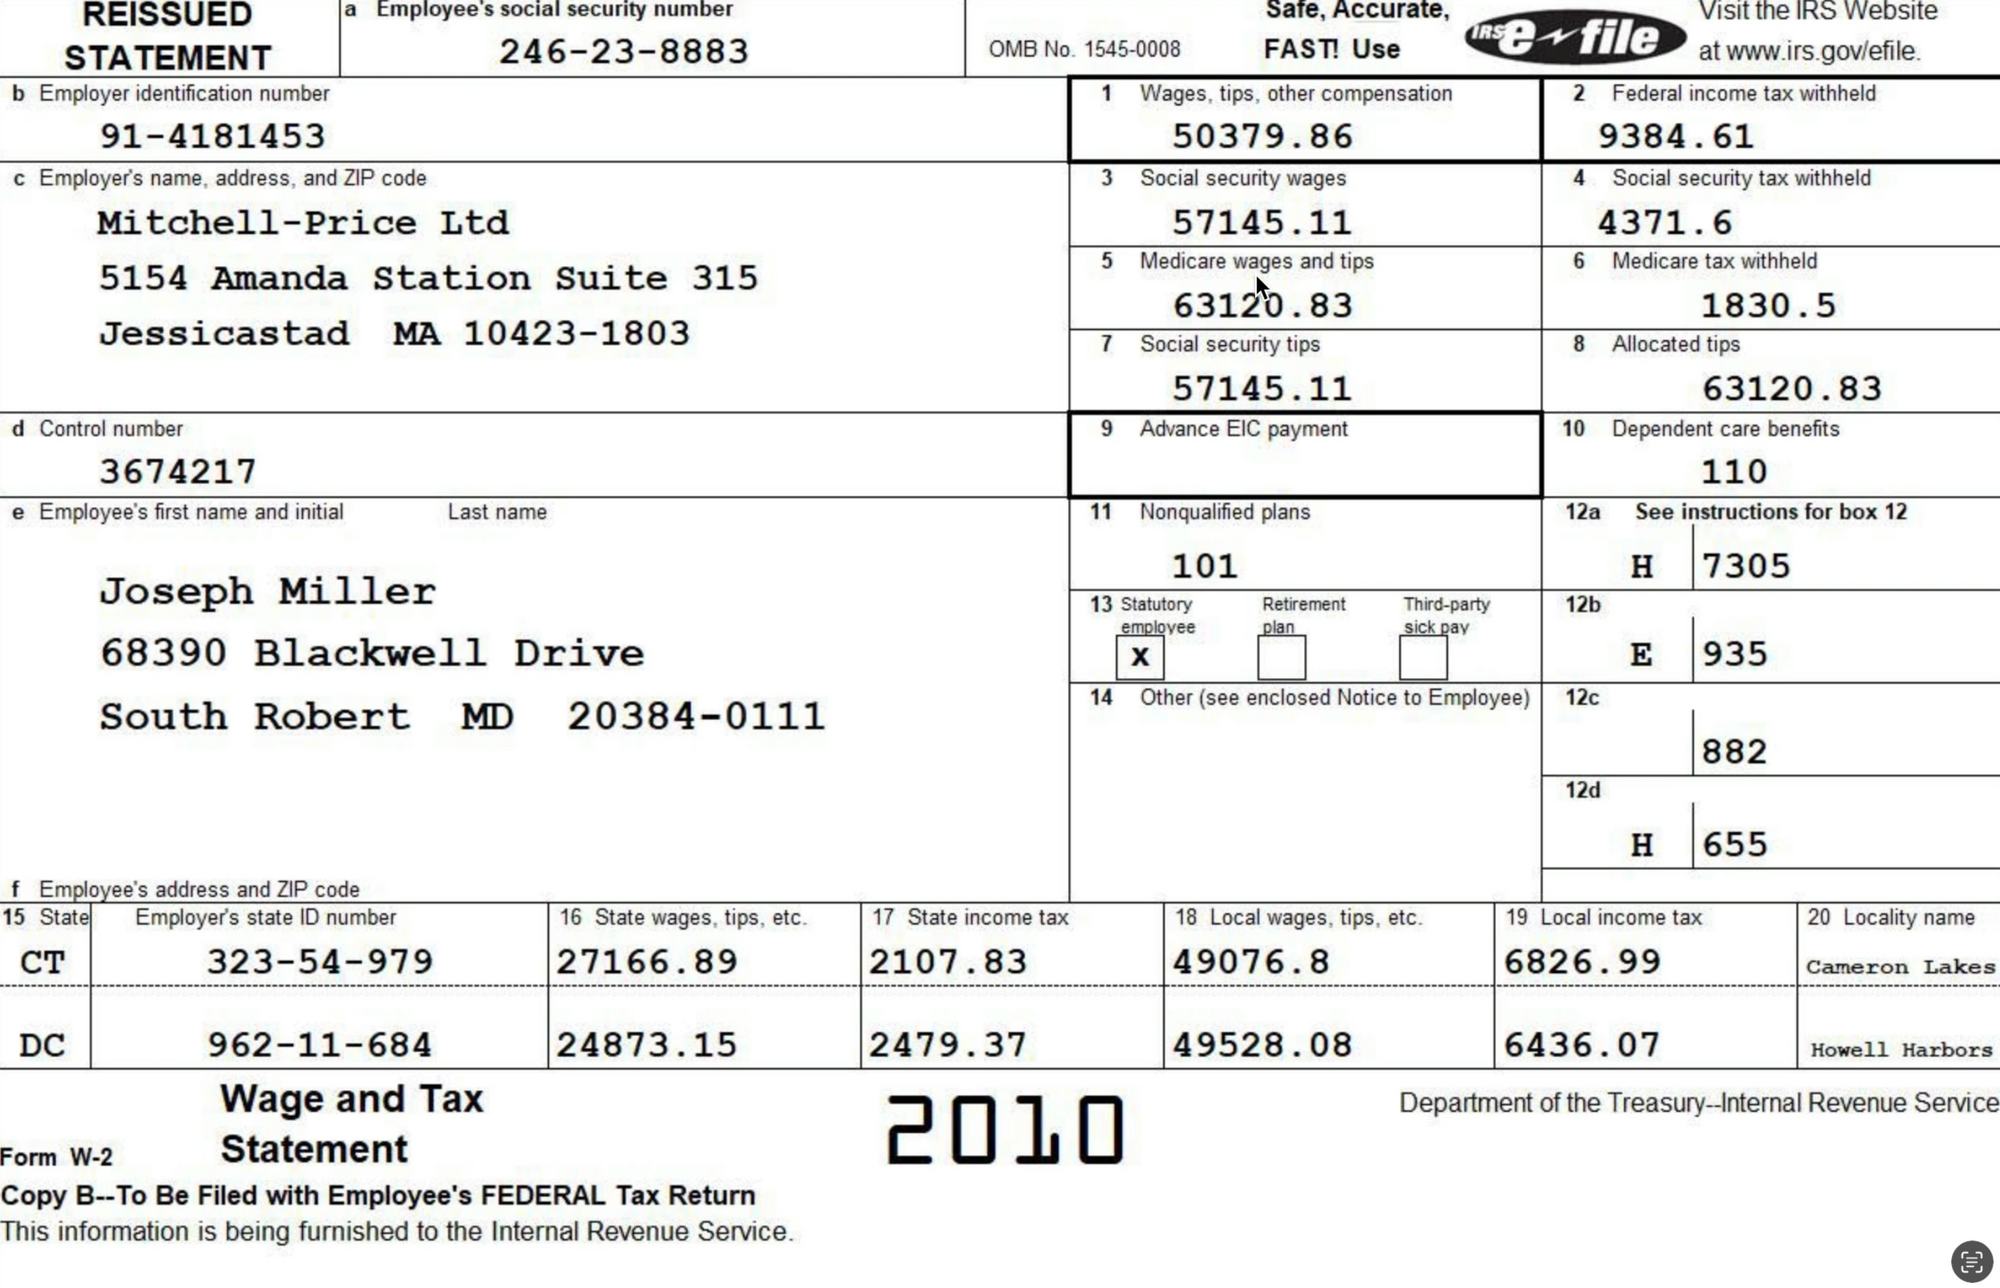
For this walk-through, we'll use a well-known document: the US IRS W-2, which is provided by US-based employers to employees and the IRS at the end of each calendar year.
The following is an example of the documents used int his post:
Web Requests
Using Document Intelligence is a two-step process:
- POST submission: A document is sent to Azure AI using an HTTP POST request. The request provides the document as a base64-encoded body, and specifies the document model to use as well as the API Key (the key is used to authorize the request and record the transaction for billing purposes).
- GET results: When a submission is sent to Azure AI, it's queued for batch processing. While the processing is typically fast (seconds), it's not immediate, and the requesting process must wait for the analysis to complete before retrieving results.
Post Request
The important components of the POST request are:
- The Azure API Endpoint: this is the endpoint assigned when we create an Azure AI service in the portal or via the
az CLI. The endpoint is globally unique to each Azure Service created. - The Command: appended to the URL is a command, specifying what action we want Document Intelligence to perform. In this case, the command we'll provide is
analyze. - The API Version: as Azure REST endpoints evolve, they may introduce breaking changes or change in behavior somewhat. By providing an API Version in the URL, we can continue to use older versions of APIs (for a limited time) in order to ensure a stable back-end response as time passes.
- The document model name: Azure AI uses a trained model to analyze a document. There are many pre-trained models avaliable for common scenarios, but often we'll train a custom model for specific types of forms used in a business. In this example we'll use the pre-trained model
prebuilt-tax.us.w2 - Ocp-Apim-Subscription-Key: like many Azure services, a key can be used to authorize requests to a specific API endpoint. This key is placed in the HTTP header.
POST request example
Following is an example of what a valid post will look like, in generic HTTP format:
POST /formrecognizer/documentModels/prebuilt-tax.us.w2:analyze?api-version=2022-08-31 HTTP/1.1
Ocp-Apim-Subscription-Key: *******************
Content-Type: application/json
Host: *******.cognitiveservices.azure.com
Connection: close
Content-Length: 230380

{
  "base64Source": "/9j/4Rk2RXhpZgA....
}
Post Response
When a valid request is sent to Azure, a response indicating the request is accepted and queued is received. For example:
HTTP/1.1 202 Accepted
Content-Length: 0
Operation-Location: https://*******.cognitiveservices.azure.com/formrecognizer/documentModels/prebuilt-tax.us.w2/analyzeResults/c308a5fa-6abf-4d80-aa85-8064f75f77b7?api-version=2022-08-31
x-envoy-upstream-service-time: 63
apim-request-id: c308a5fa-6abf-4d80-aa85-8064f75f77b7
Strict-Transport-Security: max-age=31536000; includeSubDomains; preload
x-content-type-options: nosniff
x-ms-region: East US
Date: Sat, 06 Jan 2024 19:00:06 GMT
Connection: close
Next w'll use the GET request to fetch the status and (hopefully) successful data extraction from Document Intelligence. To make the GET request, we need to save the request id provided via the apim-request-id response header.
Getting Results
To fetch the status and results of the document intelligence process, we can use a GET request. The GET has the following requirements:
- The Azure API Endpoint: this is the same endpoint assigned when we create an Azure AI service in the portal or via the
az CLI. - The API Version: the GET request also requires the API key to be provided in the
Ocp-Apim-Subscription-Keyrequest header. - The request id. The request id provided by the POST response is passed to GET via the URL.
GET /formrecognizer/documentModels/prebuilt-tax.us.w2/analyzeResults/c308a5fa-6abf-4d80-aa85-8064f75f77b7?api-version=2022-08-31 HTTP/1.1
Ocp-Apim-Subscription-Key: ****************
Host: ************.cognitiveservices.azure.com
Connection: close
When the request has been successfully completed, the response to the GET request will include a succeeded status, information about the model used and when the request was received and completed, as well as the result of the analysis.
Response Example
{
  "status": "succeeded",
  "createdDateTime": "2024-01-06T19:00:07Z",
  "lastUpdatedDateTime": "2024-01-06T19:00:12Z",
  "analyzeResult": {
    "apiVersion": "2022-08-31",
    "modelId": "prebuilt-tax.us.w2",
    "stringIndexType": "textElements",
    "content": { .... }
}
If the request failed or is still queued when the status is requested, the payload will reflect these scenarios.
Success Payload Example
If the request has successfully completed, the content will include the data extracted from the form(s) found in the submitted image.
An example of a W-2 response is as follows (only a small subset of the full response is illustrated).
Note that each field found in the form includes not just the value, but also the data type, confidence, and coordinates of a polygon where the field was found.
.
.
.
 "DependentCareBenefits":
 {
   "type": "number",
   "valueNumber": 110,
   "content": "110",
   "boundingRegions": [
     {
       "pageNumber": 1,
       "polygon": [1049, 283, 1084, 283, 1084, 301, 1049, 301]
     }
   ],
   "confidence": 0.999,
   "spans": [
     {
       "offset": 676,
       "length": 3
     }
   ]
 }
.
.
.
Base64 Encoding
When submitting POST requests to the back-end Azure AI Services, the document content is expected to be encoded from binary to Base64 ASCII.
Within an application (such as a web app or desktop app), SDKs are typically available to Base64 encode byte arrays to strings. In the case of using an API test tool, you may also have access to automatic Base64 encoding methods (such as with Postman).
If you do need to encode your own files, a handy way to do it is using the OpenSSL CLI to encode a file, then stuff it into the clipboard (macOS example here):
Encoding the File
Encode the file with the OpenSSL API:
openssl base64 -in <binary filename> -out <base64 filename>Once the file is encoded, you can open it and copy/past the value into your request. Or, if using macOS, use the built-in pbcopy terminal command to stuff the file contents into the clipboard:
pbcopy < <base64 filename>Summary
This post provides some high-level guidance on using the Document Intelligence REST API. For more detailed instructions and examples, check out the YouTube video, which goes into more detail.
Code Available
The Jupyter notebook used in this post is available on GitHub using this link.